Saturday, June 23, 2018

How to Use Find My iPhone & Locate The Lost iPhone

How to Set up Find My iPhone on Your iPhone/iPad

Before you learn how to use Find My iPhone software, you should get it properly set up on your iPhone or iPad device.

How to Set up Find My iPhone on Your iPhone/iPad

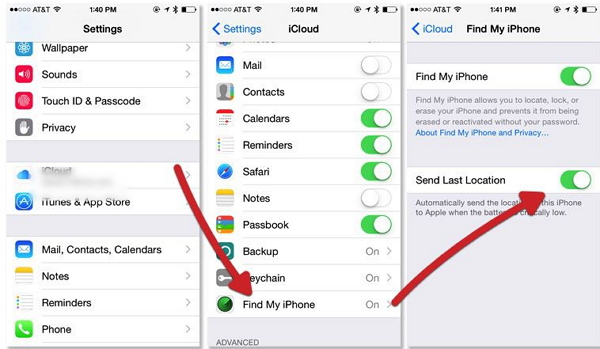
  1. Go to the settings menu of your device and tap your iCloud account listed under your name. However, if you are using an older version (iOS 10.2 or earlier), you can go to Settings and select iCloud straightaway.
  2. You will be able to see the Find My iPhone app under the iCloud, then just tap it.
  3. Then, sign in with your Apple ID and password.
  4. Now, you will need to switch on the options called “Find My iPhone” and “Send Last Location”.
set-up-find-my-iphone
Tip: The other Apple devices such as Apple Watch and AirPod that are paired to your iPhone or iPad, will be configured automatically at the completion of the above setup.

How to Use Find My iPhone to Locate The Lost iPhone

With An iOS Device

1. Get hold onto another iOS device.
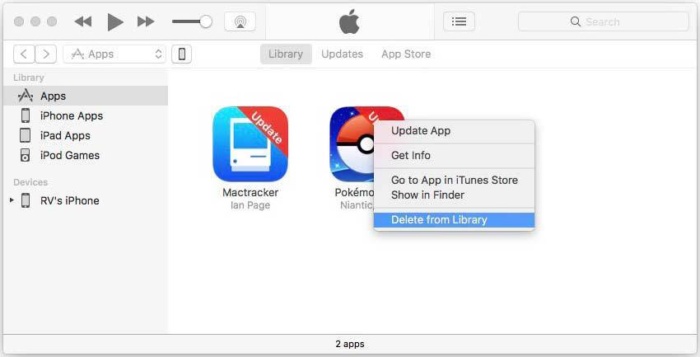
2. Tap on the Find My iPhone app located in the Apps.
3. Enter your device’s Apple ID and password.
4. On the screen, you will be able to notice a compass. In addition to that, you can see the term “Locating”. It means that the tracking process is started. A couple of notifications will appear; these notifications will let you allow Find My iPhone app to turn on the option called “Send Last Location”.
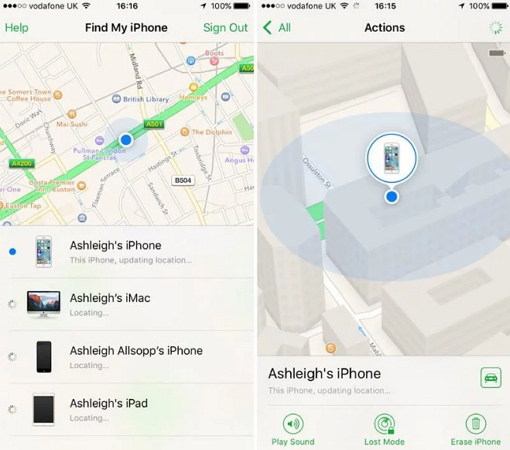
5. You will be directed to a map by now. This map will show the locations of all the devices you own.
6. Identify your lost device and zoom in.
7. After locating your iPhone, you have a couple of options to consider.
  • Play a sound if you are really close to the device.
  • Switch it into “Lost Mode” and make it send its location.
  • If you cannot accomplish any of the above, go to Erase iPhone (so your data will not be misused by a third party).
8. After selecting the appropriate option, sign out from Find my iPhone.
locate-lost-iphone-on-ios-device

With iCloud.com

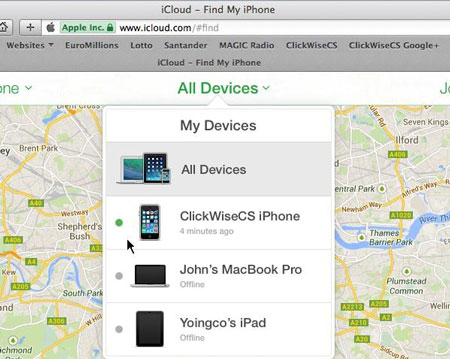
  1. Use a web browser and type in www.iCloud.com.
  2. Enter the credentials to log into your iCloud account.
  3. Go to Find iPhone (which is located in the main menu).
  4. You will be required to enter Apple ID and password to sign in.
  5. Select “All Devices” and go to the device you need to locate.
  6. Now, you can zoom in the map and locate your device closely. Now can simply choose an option from the upper right corner.
  7. Play a sound (if the device is left on silent mode and it is somewhere in the house, this can be useful).
  8. Lost mode (you can enter a contact number which will be displayed on the screen of the lost device together with a notification sound).
  9. Erase mode (if you are unable to get your device back, erase all the data).
icloud-find-my-iphone

What If Find My iPhone Isn’t Working

Common reasons that Find My iPhone may not work

After a successful configuration of Find My iPhone app, your iOS device may not show up due to three reasons.
  • The device’s battery is dead or it is switched off
  • The device doesn’t have access to internet
  • The device’s Location Service is turned off

Available Options When Find My iPhone Doesn’t Work

  1. Enable “Notify Me When Found” option to let the Find My iPhone app notify you as soon as it is connected to internet.
  2. Select any of three options (Play Sound, Lost Mode or Erase); the selected option will get activated as soon as the device is connected to internet.
  3. Select “Remove from Account” (if you have purposely got rid of the device and you don’t need to track it any more).

Quick Quiz about Find My iPhone & Your iPhone Data

Can I find my iPhone /iPad if the SIM card is removed?

As long as your device is turned on and connected to internet, you can do it. When connected to internet, Find My iPhone app can locate your device’s current location.

Can I locate my iPhone /iPad if I had Location Services turned off, or Airplane Mode turned on?

You cannot. There is no way for your device to send its location with such configuration.

Can I locate my iPhone /iPad if it’s been erased or restored?

There is no way to track your iPhone if it is restored or erased.

Can I start using iCloud after my iPhone is stolen to wipe the phone?

No. You must have iCloud configured with Find My iPhone app before losing the device.

How to find a lost iPhone that is turned off or offline?

As long as your iPhone is turned off, you cannot track it. However, you can keep the “Notify Me When Found” option activated in order to get a notification as soon as your device goes online.
Gihosoft iPhone Data Recovery is a professional iPhone Data Recovery software to get back all your lost text message, photo, video, call history, note, contact and more from iPhone/iPad/iPod Touch. It offers a full solution to recover your lost data in different tough situations. Besides recovering data directly from iPhone, iPad and iPod touch, it also allows you to recover data from iCloud and iTunes backup files.

Music Not Restored to New iPhone? Here Are The Solutions


Restore Music to New iPhone via iTunes


You can restore any type of media on your new iPhone or any new iDevice using iTunes. This method depends on that you already have a iTunes backup on your mac or PC. Blow is the guide to restore your iTunes library to new iPhone.


Step 1: Open iTunes from the platfrom you used to back up your device whether it Mac or PC.


Step 2: Now connect your iPhone to the computer using the USB cable. If a message pops up in front of you asking for the passcode, you have to follow the steps.


Step 3: Select your iPhone when it appears in the iTunes. On the left sidebar, choose "Music".

Related Articles:Gihosoft Free iPhone Data Recovery


Step 4: Check “Sync Music” and check the purchased music you want to transfer to iPhone. Tap Apply to sync the purchased songs to iPhone.


Gihosoft iPhone Data Recovery is a professional iPhone Data Recovery software to get back all your lost text message, photo, video, call history, note, contact and more from iPhone/iPad/iPod Touch. It offers a full solution to recover your lost data in different tough situations. Besides recovering data directly from iPhone, iPad and iPod touch, it also allows you to recover data from iCloud and iTunes backup files.


How to Back Up iCloud Drive Files?


How to Back Up iCloud Drive Files?


How to Back Up iCloud Drive Files on Mac


Backup on Mac is the first reference as it is the easiest way to do it within seconds. It is just the game of copy & paste. Follow this easily imposed way.


Initiate with the Finder window on your Mac.


Hit the iCloud Drive in the sidebar of your Finder window.


Choose the first application folder from which you want to copy the file data.


Select the files which you want to copy for the second backup. You can select multiple files in a row to do it just in seconds.


Right click on the selected files and click on the Duplicate option.


Drag the duplicate files to the storage folder on your Mac. We recommend any Cloud-based storage such as Dropbox, Google Drive etc.


Important to remember, it is the easiest way to keep the archived storage of your business assets or beloved memories. If you want to keep working on these files then stay connected to your source App.
2. How to Back Up iCloud Drive Files on iPhone or iPad


Upgraded iOS 11 system has been renamed the iCloud Drive to Files folder. You can keep the storage here to move the files from your iDevice to another save location anytime.


Here are steps to follow up.


Initiate with the Files folder on your iPhone or iPad.


Tap the iCloud Drive under Locations.


Get in one folder to select the files. Or directly locate one file if you don't create a folder for your files.


Tap on the Select option on the right upper corner of your screen.


Check all the files you want to save for longer.


Now copy these files by clicking on the copy button at the bottom which looks like square holding a +plus icon.


Click on the Select again to select the copied files.


Click on the Share icon and let's share the files to secondary storage folder such as Google Drive.


Important to remember that it is the second solution to save archived files for a long time. If you want to edit or update the files again then you should work on the source App or the original file.
3. How to Back Up iCloud Drive Files from iCloud.com


iCloud Drive has been appreciated to provide this online service to its users. iOS users can transfer their data storage from iCloud to any computer anytime and anywhere. It doesn't matter if you are working on iOS system or Window's system. You can access iCloud.com from any browser. Here's, how to do it.


Browse iCloud.com from any browser on your computer.


Simply Sign-in with your Apple user account.


Click on iCloud Drive icon.


Choose and open the folder from which you want to copy the files.


Select the files you want to copy. You can select multiple files at once by your keyboard.


Tap on the Download button at the top of the screen page.


The files will be downloaded directly to the Downloads folder on your computer.


You can copy and paste the files to any other location on your computer.


The central point is that this is the way to keep the storage save for longer. Because your beloved memories or business assets are the milestone of your life. If you want to edit or update the files again then keep working on your iPhone source App.
Gihosoft iPhone Data Recovery Free
Free iPhone Data Recovery Software for Windows/Mac
Recover up to 12+ types of files, including contacts, SMS, photos, WhatsApp, Viber, notes, etc.
Restore lost data from iOS devices directly or from iTunes and iCloud backup
Recover iPhone data lost due to iOS upgrade/jailbreak, accidental deletion, device lost or broken
Support all the latest iPhone, iPad and iPod Touch
Both Free and Pro version.
If you lost data after you updated to a new iPhone, you can always use Gihosoft iPhone Data Recovery to get the data back from the old iPhone or backup.You may also like: iphonerecovery.com
If you use android phones, please choose Gihosoft Android Data Recovery.
With Gihosoft Android Data Recovery, no longer afraid of data loss!
Gihosoft RePicvid Free Photo Recovery Software provides a free photo recovery software for windows to help users recover the deleted or lost photo for free.
Jihosoft Android Data Recovery: the best Android Data Recovery software for Windows and Mac to recover deleted contacts, messages, photos, videos, WhatsApp and etc from Android devices.Tips:How to transfer messages from iPhone to iPhone
Jihosoft File Recovery:Recover deleted, Lost, formatted, or corrupted files from PC, flash drive and memory card easily & safely


Gihosoft iPhone Data Recovery is a professional iPhone Data Recovery software to get back all your lost text message, photo, video, call history, note, contact and more from iPhone/iPad/iPod Touch. It offers a full solution to recover your lost data in different tough situations. Besides recovering data directly from iPhone, iPad and iPod touch, it also allows you to recover data from iCloud and iTunes backup files.

A hacker bypasses iPhone passcodes on iOS 11 or later


According to ZDNet Matthew Hickey, a security specialist, and a hacker has discovered a method to brute force the iPhone or iPad passcode running iOS 11 or later.


In the earlier iOS version, all iOS devices have a encryption and have a functionality of four or six-digit passcode protection which was impossible to break or unlock iPhone or iPad without a passcode.


And if the wrong passcode is entered too many times, the device gets a locked out and have to wait until the time frame which then needs to restore it to the factory setting.


Now security researcher and co-founder of cybersecurity firm Hacker House have found a way to bypass wrong passcode limit on iOS 11 or later and has posted on Vimeo.


Hickey found a way around that. He explained that when an iPhone or iPad is plugged in and a would-be-hacker sends keyboard inputs, it triggers an interrupt request, which takes priority over anything else on the device. 
Must Read:If you lost data after you updated to a new iPhone, you can always use Gihosoft iPhone Data Recovery to get the data back from the old iPhone or backup.
Gihosoft Free iPhone Data Recovery:iphonerecovery.com
If you use android phones, please choose Gihosoft Android Data Recovery


Apple needs to fix this hack, that is why Apple is rolling out a new feature called USB Restricted Mode in its upcoming iOS 12 update making more difficult to bypass.


For more details see here


Gihosoft iPhone Data Recovery is a professional iPhone Data Recovery software to get back all your lost text message, photo, video, call history, note, contact and more from iPhone/iPad/iPod Touch. It offers a full solution to recover your lost data in different tough situations. Besides recovering data directly from iPhone, iPad and iPod touch, it also allows you to recover data from iCloud and iTunes backup files.

Friday, June 22, 2018

Can You Recover Deleted Kik Messages from iPhone X without Backup?


Can You Recover Deleted Kik Messages from iPhone X without Backup?


If you are wondering what would be the answer for this question, we would like you to stay relax and read this.


You can recover deleted Kik messages from iPhone X without backup. Let us explain the recovery principle for you. Actually iPhone use SQLite database to store the data in it. When some data is deleted accidentally, it doesn't get removed as soon as you delete it. Actually it just makes the space of the delete data available for the new data to enter in the device. The deleted data itself gets hidden in the iPhone X. Only if there is no new data occupying the space of it (overwriting the deleted data), you can find that hidden files and recover them without having backup. But we would like to inform you that you'd better recover data as soon as you delete them, or the new data might overwrite the deleted or hidden data.Gihosoft iPhone Data Recovery is a professional iPhone Data Recovery software to get back all your lost text message, photo, video, call history, note, contact and more from iPhone/iPad/iPod Touch. It offers a full solution to recover your lost data in different tough situations. Besides recovering data directly from iPhone, iPad and iPod touch, it also allows you to recover data from iCloud and iTunes backup files.


How to Use Memoji on iOS 12

How to Use Memoji on iOS 12


At WWDC, Apple introduces iOS 12 featuring a new Memoji , an alternative update of Animoji.


Memoji is like a real face icon and is customizable. You can choose the hairstyle, skin color, hairstyle, eye color, nose shape and more just like you. You can manually send the Memoji with iMessage, in Live Camera View, and on Facetime.


How to Create Your Own Memoji Character


Step 1: Launch the Message on iPhone X. Tap on Animoji icon from the list. You’ll see a


Memoji . Tap on that and you’ll enter the editing screen to customize the Memoji of your own.


Step 2: When creating the Memoji, you will see the Live preview and your facial movement.


Step 3: Now select the skin tone, hairstyle, headshape, eyes, brows, nose, lips,eyewear, headwear and more to the color of your own that suits you.


Step 4: After you’ve customized your Memoji character, tap on Done.


How to Use Your Memoji in iMessages on iOS 12


Step 1: Launch the Messages app on your iPhone X and go to any iMessage conversation.


Step 2: When message input, you’ll see a row of iMessage apps like Photos, App Store, Animoji and more. Tap on the Animoji.


Step 3: There you will find all of the previous Animojis and your Memoji character you have created above.


Step 4: You can send Memoji instantly or can drag it as a sticker on iMessage app. Also, you can tap on the red recording button to record you Memoji expression again and send it.


How to Use Memoji Using Camera in iOS 12


In Message app, you can also send the Memoji using the camera option on it. Here’s the trick and it’s how;


1. When you’re in an iMessage app and opening the conversation, tap on the Camera button just above of other apps.


2. It will open up Camera, tap on the Effects button on the left side of the iMessage Camera app.


3. Tap on Animoji icon and select the Memoji and tap the shutter icon.


4. With Effects, you can apply the filters, stickers, text, markup tool & more. Choose and design in your own way and tap Done. 
Must Read:If you lost data after you updated to a new iPhone, you can always use Gihosoft iPhone Data Recovery to get the data back from the old iPhone or backup.
Gihosoft Free iPhone Data Recovery:iphonerecovery.com
If you use android phones, please choose Gihosoft Android Data Recovery


5. Now press the big blue button to send it.

It’s really making fun when sending Memoji giving the real expression. I love it.

Gihosoft iPhone Data Recovery is a professional iPhone Data Recovery software to get back all your lost text message, photo, video, call history, note, contact and more from iPhone/iPad/iPod Touch. It offers a full solution to recover your lost data in different tough situations. Besides recovering data directly from iPhone, iPad and iPod touch, it also allows you to recover data from iCloud and iTunes backup files.

Thursday, June 21, 2018

Do Not Jailbreak Your iPhone & iPad


Do Not Jailbreak Your iPhone & iPad
An unusual posts has been made by Apple on their support page that suggests iOS users not to Jailbreak their iPhone & iPad to be safe from security vulnerabilities, instability, shortened battery life and other issues.


Apple clearly notes that, Jailbreaking can cause numerous issues to the hacked iPhone, iPad, or iPod Touch such as:


Security vulnerabilities: Jailbreaking your device eliminates security layers designed to protect your personal information and your iOS device. With this security removed from your iOS device, hackers may steal your personal information, damage your device, attack your network, or introduce malware, spyware, or viruses.


Instability: Frequent and unexpected crashes of the device, crashes, and freezes of built-in apps and third-party apps, and loss of data.


Shortened battery life: The hacked software has caused an accelerated battery drain that shortens the operation of an iPhone, iPad, or iPod touch on a single battery charge.


Unreliable voice and data: Dropped calls, slow, or unreliable data connections, and delayed or inaccurate location data.


Disruption of services: Services such as iCloud, iMessage, FaceTime, Apple Pay, Visual Voicemail, Weather, and Stocks, have been disrupted or no longer work on the device. Additionally, third-party apps that use the Apple Push Notification Service have had difficulty receiving notifications or received notifications that were intended for a different hacked device. Other push-based services such as iCloud and Exchange have experienced problems synchronizing data with their respective servers.


Inability to apply future software updates: Some unauthorized modifications have caused damage to iOS that is not repairable. This can result in the hacked iPhone, iPad, or iPod touch becoming permanently inoperable when a future Apple-supplied iOS update is installed. 
Must Read:If you lost data after you updated to a new iPhone, you can always use Gihosoft iPhone Data Recovery to get the data back from the old iPhone or backup.
Gihosoft Free iPhone Data Recovery:iphonerecovery.com
If you use android phones, please choose Gihosoft Android Data Recovery


This is the first time that Apple has come up with this kind of article relating to Jailbreaking. It clearly suggests users not to Jailbreak iPhone or iPad and not to make any kind of modifications on iOS.


iOS 11.3 Jailbreak is coming very soon. What are your thoughts on it? Will you still Jailbreak your iOS device or will you listen to Apple?


Sponsor Ads:
Gihosoft iPhone Data Recovery is a professional iPhone Data Recovery software to get back all your lost text message, photo, video, call history, note, contact and more from iPhone/iPad/iPod Touch. It offers a full solution to recover your lost data in different tough situations. Besides recovering data directly from iPhone, iPad and iPod touch, it also allows you to recover data from iCloud and iTunes backup files.

Saturday, June 16, 2018

7 Common Solutions Provided by Apple for iTunes Download Error

7 Common Solutions Provided by Apple for iTunes Download Error


Here are some regular ways that provided by Apple to have a try when you can successfully install your iTunes.
1 Sign in as an Administrator


If you aren’t the only person who uses the computer that you’re on, then you might not be an administrator. As such, you could be unauthorized to install new programs. If this is the case, you need to either sign in as the administrator or find out who is.


If you are not sure you are in an administrator account or not, click here to check.
2 Install the Latest Windows Update


Have you been avoiding those Windows updates? They’re time-consuming but they’re also necessary. Make sure that your Windows version is up to date and if not, update it. You can refer to Windows Update FAQs.


3 Download the Latest iTunes


You may be trying to install an earlier version of iTunes which may be bugged or has known issues. You can simply check for updates for your iTunes.Sponsor Ads:


Gihosoft iPhone Data Recovery is a professional iPhone Data Recovery software to get back all your lost text message, photo, video, call history, note, contact and more from iPhone/iPad/iPod Touch. It offers a full solution to recover your lost data in different tough situations. Besides recovering data directly from iPhone, iPad and iPod touch, it also allows you to recover data from iCloud and iTunes backup files.


How-To: Open iTunes, go to Help > Check for Updates, and click on Update.


4 Repair iTunes


Although not everyone knows this, iTunes actually has a repair tool in its installation file. You need to download iTunes first. Head to this folder and look for “iTunes6464Setup” or “iTunesSetup” file. Right-click on the file, click on “Run as administrator”, and choose the repair option.


5 Remove Previous iTunes Components


Another possibility is that old iTunes files are conflicting with the installation. Try uninstall iTunes and its related components from the previous installation. Then reinstall iTunes.


The screenshot below shows you all the related components of iTunes:


6 Disable Security Programs


While a bit risky, you can disable your firewall and check whether or not it is preventing iTunes from installing properly. Similarly, close any other programs that you think could interfere.


For example, go to "Control Panel > System and Security > Windows Defender Firewall" and select "Turn Windows Defender Firewall on or off".


7 Restart Your PC


Sometimes all you have to do is turn it off and on. After you’ve restarted your PC, try installing iTunes again.

Top 4 Free Ways to Sync Outlook Contacts with iPhone


1. Sync Outlook Contacts with iPhone Via Email

You can easily sync your Outlook contacts with iPhone via email. But while this method may be effective, the contacts will not be automatically updated when you make changes to them. That said, here’s how to sync outlook contacts with iPhone via email;
Step 1: In your Outlook account, create .vcf file of all your contacts. You can do this by selecting the contacts and then right-clicking and selecting “Send as a Business Card.” Send this file to your own email address.
Step 2: Open the email in Outlook and save the attached file on your computer like “c:/contacts.”
Step 3: Open command prompt and then enter “c:/contacts” or whatever name you gave the temporary file. Hit enter and then type “copy/a*.vcf c:/contacts and then hit enter again. This will create a copy of the merged .vcf files.
Step 4: Now send this file to your own email address again. And on your iPhone, open the email and open the .vcf file. Tap “Add All Contacts” to sync the contacts.

2. Import Outlook Contacts to iPhone Via iCloud Control Panel

You can also easily sync all the contacts in Outlook to iPhone using iCloud control panel. Here’s how to do that;
Step 1: Download and install iCloud control panel if you don’t already have it. Open it and then sign in with your iCloud ID and password.
Step 2: In the primary interface, ensure “Contacts, Calendars, & Tasks with Outlook” is selected.
Step 3: Click “Apply” and in a few minutes all the contacts in outlook will be available in iCloud.
Step 4: On your iPhone, go to Settings > iCloud. Sign in and then turn on Contacts & Calendars to complete the process.
lost iphone messages without backup

3.Transfer Outlook Contacts to iPhone Via iTunes

Ensure that you have the latest version of iTunes installed on your computer and then follow these simple steps to do it;
Step 1: Connect the iPhone to the computer and then launch iTunes.
Step 2: Go to “Devices” on the left sidebar and locate the iPhone.
Step 3: Click on the “Info” tab on the upper portion of the screen.
Step 4: Ensure that “Sync Contacts with” is selected and in the drop-down menu select “Outlook.” Here, you can also choose to sync all contacts or sync only a few selected groups. Click “Apply” when you’re happy with your selection.
If Outlook notifies you that iTunes is attempting to access your data, you will need to click “Allow Access” for the process to continue.
Transfer Outlook Contacts to iPhone Via iTunes

4. Sync Outlook with iPhone Using Exchange

If you have Microsoft Exchange on your computer, you can use it to sync iPhone contacts with Outlook. The process is relatively simple. Here’s how to do it;
Step 1: Set up your Outlook account in Exchange.
Step 2: On the iPhone, go to Settings > Mail, Contacts, Calendars > Add Account and choose “Microsoft Exchange.”
Step 3: Sign in using your username and password and then tap “Next”
The iPhone will need to contact the Exchange Server. You may need to  enter the server's address.
Once you’ve entered the server, you can then choose the kind of data to be synced between the iPhone and Exchange. You can sync, emails, contacts, calendars and notes.

iTunes Error 11503?


Other Solutions

Here are some other solutions you can try:

1 Select Individual App to Update

iTunes Error 11503 may occur when you try to update all apps with a single click via the option ‘Update All Apps’. So to prevent this error from occurring, you can simply choose individuals apps one-by-one in order to update. This may take relatively more time, but in this way you won’t encounter the error 11503.

2 Clear the Cache of Apps

Clearing the cache of apps on your iDevice sometimes helps solve iTunes error 11503. This is because cached files sometimes delay the app download or update process which leads to this error. So you simply need to clear the app cache to get rid of the problem for good.
Follow these instructions:
Step 1: Open Settings app on your iDevice.
Step 2: Navigate to General > Storage & iCloud Usage > Manage Storage > Documents and Data.
Step 3: Now choose an app that you are trying to update via iTunes, select all the unwanted items shown on the left side of the screen and then tap Delete.
Step 4: Click Edit > Delete All in order to clear app’s data.Gihosoft iPhone Data Recovery is a professional iPhone Data Recovery software to get back all your lost text message, photo, video, call history, note, contact and more from iPhone/iPad/iPod Touch. It offers a full solution to recover your lost data in different tough situations. Besides recovering data directly from iPhone, iPad and iPod touch, it also allows you to recover data from iCloud and iTunes backup files.

Clear the Cache of Apps

3 Delete and Re-Download Apps within iTunes

You can also fix iTunes error 11503 by deleting and re-downloading the apps (that give this error) from your App Library.
Follow these instructions:
Step 1: Open iTunes and navigate to the App Library.
Step 2: Right-click on the app that gives error 11503 and then click ‘Delete from Library’ option. Click Move to Trash to confirm your action. Alternatively, you can also delete apps from your iTunes Library by navigating to Mobile Applications folder located in iTunes folder on your computer’s hard drive and delete the. ipa files.
delete app from library
Step 3: Once the app is deleted, re-download it via iTunes. The problem should be fixed now and you won’t encounter error 11503 when updating the re-downloaded app.